

March 3, 2026
How to Fix Blurry iPhone Pictures


How to Fix Blurry iPhone Pictures
You take a photo at the perfect moment, open it, and it looks blurry. Sometimes it is only slightly soft. Other times it looks smeared, grainy, or much worse than it should from a modern iPhone.
The good news is that blurry iPhone photos usually happen for a few predictable reasons: low light, missed focus, camera shake, zoom, a dirty lens, or compression after sending and uploading. Once you know which one you are dealing with, the fix is usually simple.
This guide covers a quick checklist, the most common causes, what you can do with the iPhone Photos app, and when it makes sense to use a dedicated tool to improve the result.
60-Second Fix Checklist
Before changing lots of settings, try these quick checks first:
Clean the lens
Fingerprints and dust are one of the biggest reasons photos look soft or hazy.Tap to focus on the subject
If the phone focused on the background instead of the subject, the main part of the photo will look blurry.Add more light
In low light, the iPhone uses a slower shutter speed, which makes blur much more likely.Avoid heavy zoom
Digital zoom makes blur and softness much more obvious.Try a light edit in Photos
A small amount of Sharpness, Definition, or Noise Reduction can help more than people expect.
A quick way to identify the issue:
background sharp but subject blurry = focus problem
streaks or smearing = motion blur
grainy and muddy = low light noise
looks okay until you zoom in = compression or low resolution
If the blur is already baked into the image, built-in edits may help a little, but stronger cases usually need a dedicated unblur, sharpen, denoise, or upscale tool.
Why Are My iPhone Photos Blurry?
1. Low light
This is the most common cause. In darker scenes, the camera needs more time to capture enough light. That often means a slower shutter, which increases blur from hand movement or from a moving subject.
Best fix: move closer to a light source, use steadier hands, and take a second or third shot.
2. The camera focused on the wrong thing
Autofocus is good, but it can still lock onto the background or a high-contrast object instead of the actual subject.
Best fix: tap directly on your subject before shooting. If focus keeps shifting, press and hold to lock focus.
3. Camera shake or subject movement
Even in decent light, blur can happen if your hands move slightly or the person, child, or pet moves at the wrong moment.
Best fix: hold the phone with both hands, tuck in your elbows, and take 2–3 quick shots instead of just one.
4. Too much zoom
Zoom does not only magnify the subject. It magnifies shake and reduces image quality, especially indoors or at night.
Best fix: move closer if possible, or use a real lens zoom option like 2x instead of pushing digital zoom too far.
5. Smudged lens or lens protector haze
A dirty lens can make the whole photo look soft. Some lens protectors can also create glare, haze, or reduced sharpness.
Best fix: clean the lens carefully and test again. If you use a protector, remove it temporarily and compare results.
6. It looks blurry only after sending or uploading
Sometimes the photo is sharp on your phone but becomes blurry in Messages, WhatsApp, or Instagram because of compression.
Best fix: turn off low-quality sending settings when possible, and upload the original image instead of a screenshot or a re-saved copy.
How to Fix Blurry Pictures on iPhone for Free
If the photo is already taken, start with the Photos app. It will not perform miracles, but it can improve mild blur and softness.
Start with Auto
Open Photos
Select the image
Tap Edit
Tap the Auto wand
If Auto helps even a little, that usually means the image is recoverable.
Use these three sliders first
Inside Edit, focus on these controls:
Sharpness for slightly soft edges
Definition for cleaner detail and contrast
Noise Reduction for grainy low-light images
Use a light touch. Too much sharpening can create halos and make faces or hair look unnatural.
Image suggestion 2: screenshot of the iPhone Photos app edit screen showing Sharpness, Definition, and Noise Reduction.
If it is a Live Photo
You may be able to rescue a sharper frame:
Open the Live Photo
Tap the Live Photo controls
Scrub through the frames
Choose the sharpest one
Tap Make Key Photo
This works especially well for kids, pets, and quick movement.
Can You Fix a Blurry Photo After It’s Taken?
Sometimes yes, but it depends on the type of blur.
Mild softness: often fixable
Grainy night photos: often improve with denoising plus light sharpening
Motion blur: some improvement is possible, but not always dramatic
Out-of-focus blur: harder to recover if the detail was never captured
Compressed or low-resolution images: often improve more with upscaling than with sharpening alone
The goal should not be to force every photo into looking ultra-crisp. The best result is usually a cleaner, more natural-looking image that is clearly better than the original.
Best Workflow Based on the Problem
If the photo has motion blur
Start with an unblur tool.
Then, if needed, apply only a light sharpen pass.
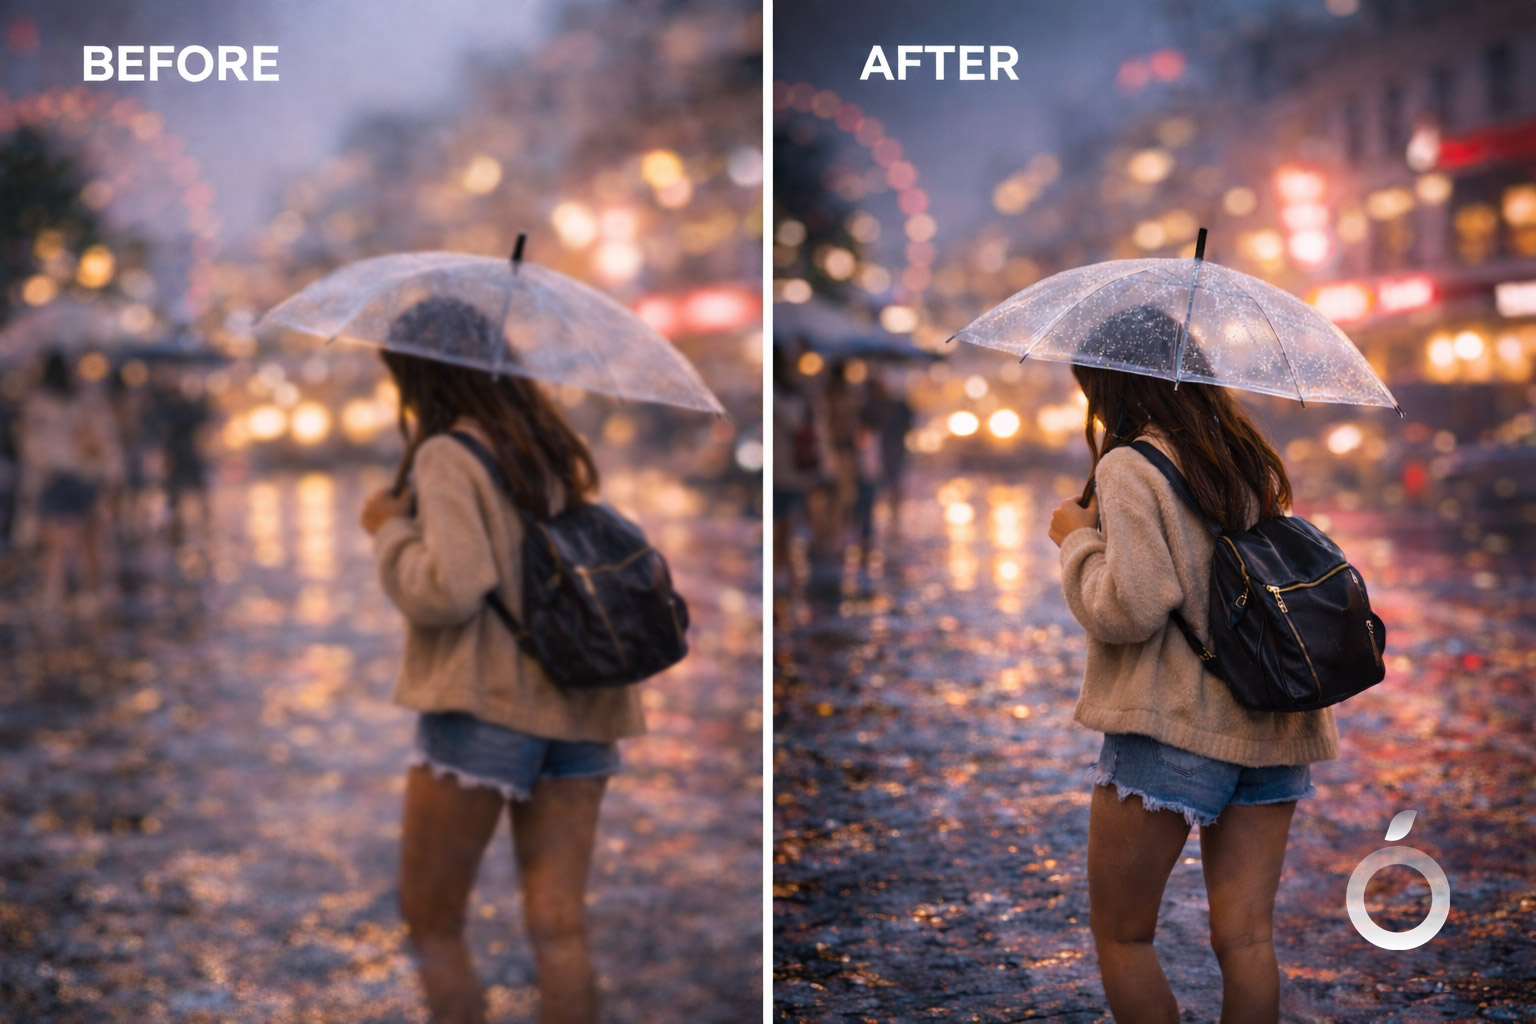
Image suggestion 3: before/after example using Citrus Unblur Photos on a shaky or motion-blurred image.
If the photo is just soft
Use sharpening carefully.
This works best for selfies, portraits, food photos, and everyday shots that are not streaky, only lacking crispness.
If the photo is grainy and blurry
Reduce noise first.
Then decide whether it still needs sharpening or unblur based on how it looks afterward.
If the photo is small or compressed
Use an upscale tool first.
Once the resolution is improved, add only a small amount of sharpening if needed.
Keep Results Natural
Most bad-looking AI enhancement happens because too much is applied at once.
A better approach is:
reduce noise first if the image is grainy
avoid stacking aggressive sharpening on top of heavy unblur
stop as soon as the image looks clean and believable
be extra careful with faces, skin, and hair
Natural usually performs better than overprocessed.
Using Citrus for This Type of Fix
If you want a faster one-tap approach, Citrus fits these use cases well:
Unblur Photos for motion blur and general blur
Sharpen Images for photos that are soft but not streaky
Reduce Noise and Grain for low-light or indoor grain
Upscale Low Resolution Photos for compressed or small images
Portrait & Face Photo Enhancer for selfies and face-focused shots
FAQ
Why are my iPhone photos blurry all of a sudden?
The most common reasons are a smudged lens, lower-light shooting conditions, focus issues, or a temporary camera glitch. Start by cleaning the lens, testing again, and checking whether anything changed in how or where the photo was taken.
How do I fix blurry iPhone pictures for free?
Start in the Photos app with Auto, then use a small amount of Sharpness and Definition. If the image is grainy, use Noise Reduction. For Live Photos, try selecting a sharper frame as the Key Photo.
Why do my pictures become blurry when I send them?
That is often caused by compression. Some apps lower image quality automatically, especially when data-saving settings are enabled.
Can you actually unblur an iPhone photo?
Sometimes yes. Mild softness and some low-light issues can often be improved. Heavy motion blur or badly missed focus is harder to fix completely, but it can still become more usable.
Why are night photos grainy and blurry?
In low light, the camera usually uses a slower shutter and higher sensitivity. That means more blur risk and more visible grain.
What if only my zoom photos are blurry?
That is very common. Zoom makes shake more noticeable and often reduces image quality. Moving closer usually gives a better result than pushing zoom further.
Final Takeaway
If your iPhone pictures are blurry, you do not need a complicated process. Start by identifying the cause: low light, focus, movement, zoom, lens haze, or compression. Then apply the simplest fix first.
For mild issues, the Photos app is often enough. For stronger blur, grain, or low-resolution images, a dedicated tool usually gives a better result with less trial and error.
Final CTA idea:
Ready to improve a blurry iPhone photo? Start with Unblur Photos.